Showing posts with label How to. Show all posts
Showing posts with label How to. Show all posts
Tuesday, May 29, 2012
How to take screenshots on Samsung Galaxy Note Upgraded with ICS Android Ice Cream Sandwich
This is now exactly how it works to take a screenshot on Samsung Galaxy Note that already upgraded and running with Android Ice Cream Sandwich ICS 4.0.3 OS. Once you already updated your Galaxy Note to ICS, the screen capture hotkey combination is now change to Volume Down and Power buttons (originally [Home] + [power] when it was in 2.3.6). This function was the same on Samsung Galaxy S2 that also updated with ICS 4 OS and probably will work on other Samsung android devices that already runs with said Ice Cream Sandwich OS.

You'll just then simply press and hold the Volume Down and Power buttons at the same time for about a second. You’ll see a flash and the screen will be framed which shows the screenshot was taken. A new notification in the notification bar saying "Saving Screenshot" and once it’s done there’ll be a "Screenshot captured"” notification in the pull down menu which will take you directly the screenshot in the Gallery.
The screenshot will be saved on your phones internal SD card - in a folder /Pictures/Screenshots. That's it, enjoy!
ContinueReading..

You'll just then simply press and hold the Volume Down and Power buttons at the same time for about a second. You’ll see a flash and the screen will be framed which shows the screenshot was taken. A new notification in the notification bar saying "Saving Screenshot" and once it’s done there’ll be a "Screenshot captured"” notification in the pull down menu which will take you directly the screenshot in the Gallery.
The screenshot will be saved on your phones internal SD card - in a folder /Pictures/Screenshots. That's it, enjoy!
Wednesday, May 9, 2012
HTC One X Factory Reset: Fix Bugs and Problem Issues
If you have a HTC One X at hand and notice some bugs and issues regarding your device and wanted to fix it accordingly the only solution for now is by doing a factory reset. This is only a temporary option just for now until your device will get a new OTA firmware updates. I hope for those who plans on buying the the HTC One X, please don't get disappointed, this is only some minor glitches from the software and also happens on some other Android devices. As I already mentioned, this can be easily fix by another software update sooner, but until there is no update yet, this is the simplest solution.

Here's a known bugs and issues that have reported by HTC One X users that have been brought together from XDA-Developer forum. Thank's to H-Cim for starting the thread and all the HTC One X users who participated and came up with some known bugs and issues altogether.
Bugs
If you’re passing HTC One X on to someone else or HTC One X has a persistent problem that cannot be solved, you can perform a factory reset (also called a hard reset).
Warning: Factory reset will permanently delete all your data and customized settings, and will remove any applications you’ve downloaded and installed. Be sure to back up any data and files you want to keep before you do a factory reset.
Performing a factory reset from settings
1. Slide the Notifications panel open, and then tap .
2. Tap Storage > Factory data reset.
3. Tap Reset phone, and then tap Erase everything.
Performing a factory reset using hardware buttons
If you can’t turn HTC One X on or access settings, you can still perform a factory reset by using the hardware buttons on HTC One X.
1. Press and hold the VOLUME DOWN button, and then press and hold the POWER button.
2. Wait for the screen with the three Android images to appear, and then release the POWER and VOLUME DOWN buttons.
3. Press VOLUME DOWN to select FACTORY RESET, and then press the POWER button.
If the problem still persist after performing hard reset, you might need to wait the new OTA software update from HTC. A software update fro HTC devs will only fix all known bugs and issues mentioned above for your HTC One X.
ContinueReading..

Here's a known bugs and issues that have reported by HTC One X users that have been brought together from XDA-Developer forum. Thank's to H-Cim for starting the thread and all the HTC One X users who participated and came up with some known bugs and issues altogether.
Bugs
- Screen stops turning orientation, even in settings menu G-sensor no longer moves. - POSSIBLE FIX : Go to taskmanager and kill all tasks - All credit and thanks go to casca
- Calendar widget crashes if more then 20 appointments - TIP : Just remove the widget since it will keep crashing until you remove it...
- Other HTC widgets seem to be causing lag too.
- GPU Rendering can't be forced.
- Live wallpaper stops on switching between screens
- GPS issues - Possible fix : Download gps status on the market and clear the a-gps data - if this works all credit and thanks go to matmar
- Screen starts "jumping"
- When browsing/camera/other Sense 4.0 related tasks -> It looks like there is "noise" on the screen. Like this
- SIM card stops working/restarts/no connection
- The three dot menu button appears in some ICS native apps, like the YouTube app for example. - Fix for this in Dev section (requires unlock)
- Tegra 3 games (and some others) lag, this is probably connect to some video driver bug. (Hardware is fast enouf to play it without lag)
- Screen reactivating after using the lock-button (only 1 click ofc)
- When opening the Clock app (just by pressing the clock on your homescreen), and moving to the Timer-tab (the one on the far right) it always adds one hour, one minute and one second to whatever time you set it to.
- Lag in Multi-Tasking window and other elements - TIP : Go to Dev Settings - disable animations. This improved the speed a lot for me (even thou most animations keep on running, only the excessive ones get turned off) [This lag is clearly a software issue, other launchers are lag-free; should be fixed soon]
- A lot of people are reporting signal problems. (No clue what's causing it)
- Yellow spots on the screen
If you’re passing HTC One X on to someone else or HTC One X has a persistent problem that cannot be solved, you can perform a factory reset (also called a hard reset).
Warning: Factory reset will permanently delete all your data and customized settings, and will remove any applications you’ve downloaded and installed. Be sure to back up any data and files you want to keep before you do a factory reset.
Performing a factory reset from settings
1. Slide the Notifications panel open, and then tap .
2. Tap Storage > Factory data reset.
3. Tap Reset phone, and then tap Erase everything.
Performing a factory reset using hardware buttons
If you can’t turn HTC One X on or access settings, you can still perform a factory reset by using the hardware buttons on HTC One X.
1. Press and hold the VOLUME DOWN button, and then press and hold the POWER button.
2. Wait for the screen with the three Android images to appear, and then release the POWER and VOLUME DOWN buttons.
3. Press VOLUME DOWN to select FACTORY RESET, and then press the POWER button.
If the problem still persist after performing hard reset, you might need to wait the new OTA software update from HTC. A software update fro HTC devs will only fix all known bugs and issues mentioned above for your HTC One X.
Saturday, October 22, 2011
How to Take Screenshot on T-Mobile Samsung Galaxy S2 T989
If you'll need to have a screen captured on your T-Mobile Samsung Galaxy S2 (S II) SGH-T989, that's too very easy. You don't need to have it rooted or install any software tools or screenshot capture application just to have a screenshots of your phone.
You can directly take a screenshots right away from your device because the Samsung Galaxy S2 is already has it's own built in screen capture function. All you need to do is just - by pressing the HOME button and then quickly press and release the Power button. (you have to push the power button quickly because the task manager comes up if you keep the home button pushed too long)
 The taken screenshots will then be saved on the phones image gallery folder.
This will also works on AT&T Samsung Galaxy S II SGH-I777 and Samsung Galaxy S II I9100 (global version). This is how tech bloggers and developers do when they want to share a screenshot sample of their newly develop android themes or custom ROMs out over on the internet.
ContinueReading..
You can directly take a screenshots right away from your device because the Samsung Galaxy S2 is already has it's own built in screen capture function. All you need to do is just - by pressing the HOME button and then quickly press and release the Power button. (you have to push the power button quickly because the task manager comes up if you keep the home button pushed too long)

This will also works on AT&T Samsung Galaxy S II SGH-I777 and Samsung Galaxy S II I9100 (global version). This is how tech bloggers and developers do when they want to share a screenshot sample of their newly develop android themes or custom ROMs out over on the internet.
Saturday, October 1, 2011
how to set a different ringtones on you Samsung Galaxy Gio S5660
This just a simple tips on how to set a different ringtones on you Samsung Galaxy Gio. If you already downloaded your favorite MP3 songs on your PC and want to transfer it in your Galaxy and customize at as your personal message or alert tones, all you have to do is connect your Samsung Galaxy Gio to your computer or laptop via USB cable and then select "connection type" and get access to storage memory card.
Here's how to connect Galaxy Gio into Mass Storage Mode Option:
- On Main Home Screen tap Menu > Settings > Application
- Enable USB Debugging
- Return to Home Screen
- Then plug the USB cable into your Galaxy S2
- Pull down status bar
- Press ' Connect USB Storage' button
 Alternative way without USB Debugging
- Go to Settings > Wireless & Network
- USB utilities and click the button >
- then plug in USB cable
Once you've establish a connection from you Galaxy Gio to your PC, just browse to your mass storage
then find the folder "Notifications", if its not on there, create a new folder and simply renamed it "Notifications".
>SDCARD/ MEDIA/ AUDIO/ NOTIFICATIONS
Then grab a copy music files you wanted from your computer and paste into that folder "Notifications". Once finishes, disconnect your Galaxy Gio from the computer. Then you can set that music files as your message tone.
- Go to Message/Inbox icon located at the bottom of your Samsung Galaxy Gio screen
- In the Message/Inbox Settings simply choose the file that you've copied as your message ringtone
If you already have a music files stored on your Samsung Galaxy Gio S5660, do this steps below:
- Go to "My Files" then copy that mp3 music file you like to use as your messages ringtone.
( Just tap and hold that music file then you can choose either to copy or move that music file)
- Next, paste that music file in your media folder > SDCARD/ MEDIA/ AUDIO/ NOTIFICATIONS
- Go to Message/Inbox icon located at the bottom of your Samsung Galaxy Ace screen
- In the Message/Inbox Settings simply choose the music file that you've copied as your message ringtone
If you have a problem about the volume loudness, this sometimes happens that your custom ringtone volume is too low compared to the pre-installed ringtone on your Galaxy Gio which as much louder.
You can try using this program, MP3GAIN, to boost up maximized the volume of your mp3's decibels.
http://mp3gain.sourceforge.net/download.php
Or this app from Android Market..Volume+ (Sound Boost)
currently using this app for my boosted up mp3s using MP3GAIN.
But works only on Gingerbread..
https://market.android.com/details?id=com.TEST.android.lvh&feature=search_result
ContinueReading..
Here's how to connect Galaxy Gio into Mass Storage Mode Option:
- On Main Home Screen tap Menu > Settings > Application
- Enable USB Debugging
- Return to Home Screen
- Then plug the USB cable into your Galaxy S2
- Pull down status bar
- Press ' Connect USB Storage' button

- Go to Settings > Wireless & Network
- USB utilities and click the button >
- then plug in USB cable
Once you've establish a connection from you Galaxy Gio to your PC, just browse to your mass storage
then find the folder "Notifications", if its not on there, create a new folder and simply renamed it "Notifications".
>SDCARD/ MEDIA/ AUDIO/ NOTIFICATIONS
Then grab a copy music files you wanted from your computer and paste into that folder "Notifications". Once finishes, disconnect your Galaxy Gio from the computer. Then you can set that music files as your message tone.
- Go to Message/Inbox icon located at the bottom of your Samsung Galaxy Gio screen
- In the Message/Inbox Settings simply choose the file that you've copied as your message ringtone
If you already have a music files stored on your Samsung Galaxy Gio S5660, do this steps below:
- Go to "My Files" then copy that mp3 music file you like to use as your messages ringtone.
( Just tap and hold that music file then you can choose either to copy or move that music file)
- Next, paste that music file in your media folder > SDCARD/ MEDIA/ AUDIO/ NOTIFICATIONS
- Go to Message/Inbox icon located at the bottom of your Samsung Galaxy Ace screen
- In the Message/Inbox Settings simply choose the music file that you've copied as your message ringtone
If you have a problem about the volume loudness, this sometimes happens that your custom ringtone volume is too low compared to the pre-installed ringtone on your Galaxy Gio which as much louder.
You can try using this program, MP3GAIN, to boost up maximized the volume of your mp3's decibels.
http://mp3gain.sourceforge.net/download.php
Or this app from Android Market..Volume+ (Sound Boost)
currently using this app for my boosted up mp3s using MP3GAIN.
But works only on Gingerbread..
https://market.android.com/details?id=com.TEST.android.lvh&feature=search_result
Tuesday, September 13, 2011
How to Increase or Boost a Low Microphone Volume on Samsung Galaxy S II
If you are having some issue with your Samsung Galaxy S II which has a low microphone volume level and finding some complaints from people you call saying that they can't clearly hears you. It is quite sometimes that some users experience this problem regarding the loudness of their Galaxy S II microphone.
This problem may only occur during "in call" status while if you run the voice recorder application and speak normally you will find that it records well quite very clearly. Some forum reports said that they have return back their Galaxy S II for fix about the low microphone. But here's some tricks that you may try first and see if this works before you have to decide to have it back to your service center.
This tricks are too simple and nothing to worry about, just do some click around with your menus, and do this steps below:
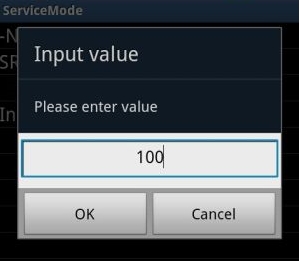
1. Setting the mic input level while the 'Noise Reduction' is turned off. You can do this by pressing the menu button while in call status then press the "Noise Reduction Off".
 - Type this code on your Galaxy S2 dial pad *#*#197328640#*#*
- A number coded menu will then show.
- Now press [5] AUDIO
- Next [1] NB (VOICE CALL)
- Next [1] HANDSET
- Next [1] VOLUME
-Next [1]SRC SPEECH RX Volume
- Then [5]5_lvl: 90 ( the 90 is the input value of the microphone volume level, yours might have a different value than 90. Just remember the default value of yours so that you can use it to revert it back again)
Now, on that window there's a line stated "Input". You are going to edit or change the input value which can be done by pressing the Menu button, then the "Key Input". Write down 110 as your new maximum microphone input level and then press "OK" This is just like adjusting the volume knob of your audio amplifier to maximize the loudness.
2. Setting the mic input level while the 'Noise Reduction' is turned On.
- Press the menu button then the "Back". You may press 4 times until you will return back from where you will see the Audio Setting and the [1] NB (VOICE CALL) is in the first line.
- This time, press [7] HANDSET(2MIC)
- Next [1] HANDSET
- Next [1] VOLUME
- Next [1]SRC SPEECH RX Volume
- Then [5]5_lvl: 90( Edit this input value like the number you have just write down from above)
Press the Menu button, then "Key Input". Write down 110 as your new maximum microphone input level.
I have proven that this tricks works on my Galaxy S II android phone, but the only certain issue is that it will automatically revert back to the default input level settings once you rebooted or restart the phone . So if you want to keep it permanent, find a way to never restart your phone, or consume your phones battery life. So, hope this works for you too.
ContinueReading..
This problem may only occur during "in call" status while if you run the voice recorder application and speak normally you will find that it records well quite very clearly. Some forum reports said that they have return back their Galaxy S II for fix about the low microphone. But here's some tricks that you may try first and see if this works before you have to decide to have it back to your service center.
This tricks are too simple and nothing to worry about, just do some click around with your menus, and do this steps below:
1. Setting the mic input level while the 'Noise Reduction' is turned off. You can do this by pressing the menu button while in call status then press the "Noise Reduction Off".

- A number coded menu will then show.
- Now press [5] AUDIO
- Next [1] NB (VOICE CALL)
- Next [1] HANDSET
- Next [1] VOLUME
-Next [1]SRC SPEECH RX Volume
- Then [5]5_lvl: 90 ( the 90 is the input value of the microphone volume level, yours might have a different value than 90. Just remember the default value of yours so that you can use it to revert it back again)
Now, on that window there's a line stated "Input". You are going to edit or change the input value which can be done by pressing the Menu button, then the "Key Input". Write down 110 as your new maximum microphone input level and then press "OK" This is just like adjusting the volume knob of your audio amplifier to maximize the loudness.
2. Setting the mic input level while the 'Noise Reduction' is turned On.
- Press the menu button then the "Back". You may press 4 times until you will return back from where you will see the Audio Setting and the [1] NB (VOICE CALL) is in the first line.
- This time, press [7] HANDSET(2MIC)
- Next [1] HANDSET
- Next [1] VOLUME
- Next [1]SRC SPEECH RX Volume
- Then [5]5_lvl: 90( Edit this input value like the number you have just write down from above)
Press the Menu button, then "Key Input". Write down 110 as your new maximum microphone input level.
I have proven that this tricks works on my Galaxy S II android phone, but the only certain issue is that it will automatically revert back to the default input level settings once you rebooted or restart the phone . So if you want to keep it permanent, find a way to never restart your phone, or consume your phones battery life. So, hope this works for you too.
Sunday, September 4, 2011
How to Fix Not Working Compass on Samsung Galaxy Gio S5660
If you'll find your Samsung Galaxy Gio S5660 Compass isn't working this solution will probably help the issue. Recently most users experience this kind of problem and consider it as a bug issue.
We have found an instruction guide by waqasshahzad1986 from xda-developer:
He noted that this solution will work on any Samsung Galaxy Gio versions.
Make sure to backup your old memsicd before doing anything .
Method 1 : download this update , and copy to sd card(don't not copy in any folder)
Put your phone into recovery mode(turn off your phone , HOLD home button + power button toghether)
Apply update from sd , locate the copied file and press home button. reboot.
Method 2:
Download compas fix file
extract on your pc , and copy to sd card
now use root explorer copy and replace to system/bin (make sure its mount r/w)
and set permissions to all 9 boxes.. reboot , and you are done
UPDATED:Latest Compass Fix extracted from S5660ZCKP4-S5660ZCKP4-S5660OZHKP4 , compass fix .
http://www.mediafire.com/?2tbx9zhp2hnmc40
Thanks to mozgoder for letting me know
Instructions
Method 1 : download the update, and copy to sd card(don't not copy in any folder)
Put your phone into recovery mode(turn off your phone , HOLD home button + power button toghether)
Apply update from sd , locate the copied file and press home button. reboot.
You have to Reboot once more otherwise it will show wrong direction.
NOTE: if this update doesn't work for you , you can try this one
http://www.mediafire.com/?t1hszgxzb56os2b
This video shows a Samsung Galaxy Gio Compass has been already fix.
Hope this will help if you are too worry about what is going on with your Samsung Galaxy Gio compass apps.
You can visit the thread at XDA-developer.
ContinueReading..
We have found an instruction guide by waqasshahzad1986 from xda-developer:
He noted that this solution will work on any Samsung Galaxy Gio versions.
Make sure to backup your old memsicd before doing anything .
Method 1 : download this update , and copy to sd card(don't not copy in any folder)
Put your phone into recovery mode(turn off your phone , HOLD home button + power button toghether)
Apply update from sd , locate the copied file and press home button. reboot.
Method 2:
Download compas fix file
extract on your pc , and copy to sd card
now use root explorer copy and replace to system/bin (make sure its mount r/w)
and set permissions to all 9 boxes.. reboot , and you are done
UPDATED:Latest Compass Fix extracted from S5660ZCKP4-S5660ZCKP4-S5660OZHKP4 , compass fix .
http://www.mediafire.com/?2tbx9zhp2hnmc40
Thanks to mozgoder for letting me know
Instructions
Method 1 : download the update, and copy to sd card(don't not copy in any folder)
Put your phone into recovery mode(turn off your phone , HOLD home button + power button toghether)
Apply update from sd , locate the copied file and press home button. reboot.
You have to Reboot once more otherwise it will show wrong direction.
NOTE: if this update doesn't work for you , you can try this one
http://www.mediafire.com/?t1hszgxzb56os2b
This video shows a Samsung Galaxy Gio Compass has been already fix.
Hope this will help if you are too worry about what is going on with your Samsung Galaxy Gio compass apps.
You can visit the thread at XDA-developer.
Sunday, July 31, 2011
Tips: How to Debrand HTC Sensation
Here's a guide that I've been found that make use in debranding HTC Sensation. A lot of advance users been looking for this guide, but yet now I found out a step by guide over XDA developer.
After searching with no success for a clear way to debrand your sensation, I finally found a way reading lots of snippets, so thought I'd write it into one guide, to help others. This guide was written assuming you're running Windows, but other OS users should be able to follow most parts, except extracting rom.zip from the RUU.
This method can also be use to rebrand/reflash back to stock.
If you follow this guide, you do so at your own risk, I cannot be held responsible if something goes wrong.
This process will wipe ALL data, including any recovery partitions or boot loaders you have installed.
S-OFF WILL BE RETAINED. This method, does not affect your CID, or require root.
 Head-over at XDA-developer and follow the step by step tutorials on how to Debrand your HTC Sensation.
ContinueReading..
After searching with no success for a clear way to debrand your sensation, I finally found a way reading lots of snippets, so thought I'd write it into one guide, to help others. This guide was written assuming you're running Windows, but other OS users should be able to follow most parts, except extracting rom.zip from the RUU.
This method can also be use to rebrand/reflash back to stock.
If you follow this guide, you do so at your own risk, I cannot be held responsible if something goes wrong.
This process will wipe ALL data, including any recovery partitions or boot loaders you have installed.
S-OFF WILL BE RETAINED. This method, does not affect your CID, or require root.

Saturday, July 23, 2011
How to Free up Internal Memory on Samsung Galaxy Ace
Here's a simple tips on Samsung Galaxy Ace that help how to free up internal memory with just one click. All you need to have is a rooted Samsung Galaxy Ace and install and used this application called "Gemini App Manager" its Free and already proven works and tried myself.
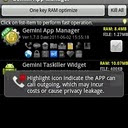
This "Gemini App Manager"can move application such as facebook, twitter etc. This also move maps but
my experience I say don't move Maps as its system application and needs to acess gps,wifi and many other system rescources so leave it on internal memory bcoz if u forecfully moved map, it will become unfuntional of no use, so leave it as it is
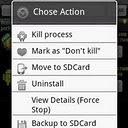
Features of this application:
Show app information (including risk info, e.g. show which app can call outgoing, or can send out SMS, or can use Camera, or can find your location (GPS), etc),
Autorun management (enable/disable conditions for autorun),
Kill process (one key RAM optimize, kill all, or kill by selection),
Move/batch move apps from phone to SD card(Android 2.2 or later),
Move/batch move apps from SD card to phone(Android 2.2 or later),
Uninstall/batch uninstall apps,
View application details
Clear app cache,
View app on market,
Sort apps by multi ways,
Filter apps by multi ways,
Grab the application here:
http://www.appbrain.com/app/gemini-app-manager/com.seasmind.android.gmappmgr
ContinueReading..


This "Gemini App Manager"can move application such as facebook, twitter etc. This also move maps but
my experience I say don't move Maps as its system application and needs to acess gps,wifi and many other system rescources so leave it on internal memory bcoz if u forecfully moved map, it will become unfuntional of no use, so leave it as it is
Features of this application:
Show app information (including risk info, e.g. show which app can call outgoing, or can send out SMS, or can use Camera, or can find your location (GPS), etc),
Autorun management (enable/disable conditions for autorun),
Kill process (one key RAM optimize, kill all, or kill by selection),
Move/batch move apps from phone to SD card(Android 2.2 or later),
Move/batch move apps from SD card to phone(Android 2.2 or later),
Uninstall/batch uninstall apps,
View application details
Clear app cache,
View app on market,
Sort apps by multi ways,
Filter apps by multi ways,
Grab the application here:
http://www.appbrain.com/app/gemini-app-manager/com.seasmind.android.gmappmgr
How to Connect the Samsung Galaxy S2/SII I9100 to PC via USB
Many users who just recently bought Samsung Galaxy S2 I9100 struggling an issue when tried to connect the phone to the PC to access the SD card though, and somehow it didn’t really work. An error message appears "Android MTP Failed!".
Some few tips below might help you to the task and managed to access the phone’s internal SD card on PC. Just ensure that you have already installed necessary drivers for your Samsung Galaxy S2 or install KIES on your PC.
Here's how,
-Enable usb debugging from Menu > Settings > Applications
-return to home screen
-plug usb cable in
-pull down status bar
-press ‘ connect usb storage’ button
or try this method:
Alternatively, without USB debugging enabled
Go to Settings > Wireless & Network > USB utilities and click the button > then (and ONLY then) plug in USB cable
Hope this helps...
Thursday, July 21, 2011
Tips: How to fix Samsung Galaxy Gio S5660 shutdown/freeze randomly
If you are having problem with your Samsung Galaxy Gio runs in Gingerbread OS that automatically shutdown, freeze and randomly reboot, try one of these:
. Install Green Power free or similar (juice defender, this you need to buy at least Plus version).
. Change your Wifi sleep policy to Never.
Go into Settings>Wireless and networks>Wifi settings
then press the menu button >advanced >wifi sleep policy
This is only a temporary solution until Samsung release for an update to fix such bugs on Samsung Galaxy Gio. If the problem still persist you can then do hard reset through settings> factory reset.
or by button combination in recovery mode. Just back all the data stored in your device first.
Press and hold Volume up+Center+Power Button, then select Wipe Cache/Factory Reset. Then select Reboot System.
ContinueReading..
. Install Green Power free or similar (juice defender, this you need to buy at least Plus version).
. Change your Wifi sleep policy to Never.
Go into Settings>Wireless and networks>Wifi settings
then press the menu button >advanced >wifi sleep policy
This is only a temporary solution until Samsung release for an update to fix such bugs on Samsung Galaxy Gio. If the problem still persist you can then do hard reset through settings> factory reset.
or by button combination in recovery mode. Just back all the data stored in your device first.
Press and hold Volume up+Center+Power Button, then select Wipe Cache/Factory Reset. Then select Reboot System.
Sunday, July 17, 2011
How to Auto Adjust the Screen Brightness on Samsung Galaxy S II I9100
Here's how to quickly change or adjust the LCD Screen display brightness on your Samsung Galaxy S II I9100, anytime you want that suit for your eyesight preference.
Here's how you can adjust the screen brightness levels to your like.
1. From Home Screen, go to Settings then Tap on Display

2.On the Brightness window, uncheck the Automatic brightness checkbox.
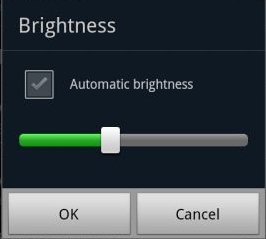
3. Return back to the Home Screen
4. At the top of the screen, by long pressing that notification bar for a second, then you can swipe it to the LEFT to Decrease and by swiping it to Right will Increase the screen brightness.
In that set up you can now manually adjust the screen brightness while reading text without going though the display settings again.
ContinueReading..
Here's how you can adjust the screen brightness levels to your like.
1. From Home Screen, go to Settings then Tap on Display
2.On the Brightness window, uncheck the Automatic brightness checkbox.
3. Return back to the Home Screen
4. At the top of the screen, by long pressing that notification bar for a second, then you can swipe it to the LEFT to Decrease and by swiping it to Right will Increase the screen brightness.
In that set up you can now manually adjust the screen brightness while reading text without going though the display settings again.
Saturday, July 16, 2011
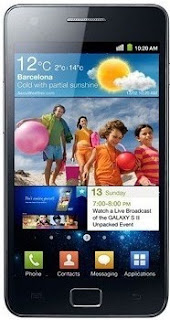
How to take screenshots on Samsung Galaxy S2/S II I9100
Here's a quick tip on how to capture or take a screenshot from your Samsung Galaxy S II. Most android phones could only capture what was on-screen using tools, or applications and many required root access first. The Samsung Galaxy S II has a Built-in screen capture, so taking screenshot is too easy and doesn't need any rooting or 3rd-party application to install.

Here is how simply you can do it: PRESS AND HOLD THE HOME BUTTON - THEN PRESS THE POWER BUTTON. So, press and hold home, then a millisecond later hit the power button. Works flawlessly every time. The image will then saved in your gallery files.
ContinueReading..
Here is how simply you can do it: PRESS AND HOLD THE HOME BUTTON - THEN PRESS THE POWER BUTTON. So, press and hold home, then a millisecond later hit the power button. Works flawlessly every time. The image will then saved in your gallery files.
Update:
The ICS already released, taking screenshots for Galaxy S2 runs with Ice Cream sandwich is change to Volume Down and Power Buttons..Press and Hold The VOLUME Down and POWER BUTTON simultaneously to take a screenshots.Tuesday, July 12, 2011
How to Set a Music /Ringtone Message Notification on Samsung Galaxy Ace S5830
Here's a simple guide on how to set a favorite songs, tones to your message alerts on your Samsung Galaxy Ace. All you have to do is connect your Samsung Galaxy Ace to your computer or laptop via USB cable and then select "connection type" and get access to storage memory card.
Here's how to connect Galaxy Ace into Mass Storage Mode Option:
- On Main Home Screen tap Menu > Settings > Application
- Enable USB Debugging
- Return to Home Screen
- Then plug the USB cable into your Galaxy S2
- Pull down status bar
- Press ' Connect USB Storage' button
Aternative way without USB Debugging
- Go to Settings > Wireless & Network
- USB utilities and click the button >
- then plug in USB cable
 Now after you have successfully connected your Galaxy Ace, browse to your mass storage
then find the folder "Notifications", if its not on there, create a new folder and simply renamed it "Notifications".
>SDCARD/ MEDIA/ AUDIO/ NOTIFICATIONS
Then grab a copy music files you wanted from your computer and paste into that folder "Notifications". Once finishes, disconnect your Galaxy Ace from the computer. Then you can set that music files as your message tone.
- Go to Message/Inbox icon located at the bottom of your Samsung Galaxy Ace screen
- In the Message/Inbox Settings simply choose the file that you've copied as your message ringtone
If you already have a music files stored on your Samsung Galaxy Ace, do this steps below:
- Go to "My Files" then copy that mp3 music file you like to use as your messages ringtone.
( Just tap and hold that music file then you can choose either to copy or move that music file)
- Next, paste that music file in your media folder > SDCARD/ MEDIA/ AUDIO/ NOTIFICATIONS
- Go to Message/Inbox icon located at the bottom of your Samsung Galaxy Ace screen
- In the Message/Inbox Settings simply choose the music file that you've copied as your message ringtone
If you have a problem about the volume loudness, this sometimes happens that your custom ringtone volume is too low compared to the preset ringtone on your Galaxy Ace which as much louder.
You can try using this program, MP3GAIN, to boost up maximized the volume of your mp3's decibels.
http://mp3gain.sourceforge.net/download.php
Or this app from Android Market..Volume+ (Sound Boost)
currently using this app for my boosted up mp3s using MP3GAIN.
But works only on Gingerbread..
https://market.android.com/details?id=com.TEST.android.lvh&feature=search_result
ContinueReading..
Here's how to connect Galaxy Ace into Mass Storage Mode Option:
- On Main Home Screen tap Menu > Settings > Application
- Enable USB Debugging
- Return to Home Screen
- Then plug the USB cable into your Galaxy S2
- Pull down status bar
- Press ' Connect USB Storage' button
Aternative way without USB Debugging
- Go to Settings > Wireless & Network
- USB utilities and click the button >
- then plug in USB cable
then find the folder "Notifications", if its not on there, create a new folder and simply renamed it "Notifications".
>SDCARD/ MEDIA/ AUDIO/ NOTIFICATIONS
Then grab a copy music files you wanted from your computer and paste into that folder "Notifications". Once finishes, disconnect your Galaxy Ace from the computer. Then you can set that music files as your message tone.
- Go to Message/Inbox icon located at the bottom of your Samsung Galaxy Ace screen
- In the Message/Inbox Settings simply choose the file that you've copied as your message ringtone
If you already have a music files stored on your Samsung Galaxy Ace, do this steps below:
- Go to "My Files" then copy that mp3 music file you like to use as your messages ringtone.
( Just tap and hold that music file then you can choose either to copy or move that music file)
- Next, paste that music file in your media folder > SDCARD/ MEDIA/ AUDIO/ NOTIFICATIONS
- Go to Message/Inbox icon located at the bottom of your Samsung Galaxy Ace screen
- In the Message/Inbox Settings simply choose the music file that you've copied as your message ringtone
If you have a problem about the volume loudness, this sometimes happens that your custom ringtone volume is too low compared to the preset ringtone on your Galaxy Ace which as much louder.
You can try using this program, MP3GAIN, to boost up maximized the volume of your mp3's decibels.
http://mp3gain.sourceforge.net/download.php
Or this app from Android Market..Volume+ (Sound Boost)
currently using this app for my boosted up mp3s using MP3GAIN.
But works only on Gingerbread..
https://market.android.com/details?id=com.TEST.android.lvh&feature=search_result
Monday, July 11, 2011
How to Remove and Change Gmail Account on Android Market without doing Factory Reset from your Android Phone
When tried to remove (settings->accounts & sync) the gmail account that was used during the initial phone setup, it erase almost anything on your phone, like contacts, photos, messages etc, and prompted this message ->

1. Download the application Root Explorer from Android Market
2. Once already downloaded or installed the Root Explorer,
Explore to /data/system/ and find this file : accounts.db
3. Delete that file (accounts.db)
4. Reboot your Android device.
5. Then you can register another account again.
ContinueReading..
Remove accountYou can simply change, erase and register new or another Gmail account, but you have to do a Factory Reset. To do a factory reset of your phone will make you set it up again from scratch. But I have a simple tips how to remove or change your GMail account on Android Market without doing a Factory reset.
This account is required by some applications. You can only delete it by resetting the phone to factory defaults.
1. Download the application Root Explorer from Android Market
2. Once already downloaded or installed the Root Explorer,
Explore to /data/system/ and find this file : accounts.db
3. Delete that file (accounts.db)
4. Reboot your Android device.
5. Then you can register another account again.
How to Add, Remove or Delete Facebook , Exchange and Gmail accounts on Samsung Galaxy S II I9100
Here's a simple guide if you want to add and or remove any network accounts on your Samsung Galaxy S II. This may help you remove old Email,Gmail, Facebook account or multiple accounts that you no longer use on Samsung Galaxy S II.
Adding an account on Samsung Galaxy S II:
1. Open Settings, the tap on the Accounts & sync selection

2. Tap on Add account

3. Select the type of account to add (Microsoft Exchange, Facebook and Google are available by default)
4. Follow the on-screen instructions to configure your account (depending on account type, you will be asked to select what kind of data to sync to your device)
5. When complete, the account is added to the list in the Accounts & sync section and data will begin synchronizing to your device
Removing an account on Samsung Galaxy S II:
1. Open Settings, then tap on the Accounts & sync selection
2. Select the desire account you want to remove or delete
3. Then Tap Remove account

 4. A pop-up message appear: Do you really want to remove this account? removing it will also delete all of its messages, contacts, and other data from phone.
proceed?
Just confirm that you want to remove the account by tapping on Remove account or tap on Cancel if you selected the wrong account
Remove account
5. Your account will now be deleted
ContinueReading..
Adding an account on Samsung Galaxy S II:
1. Open Settings, the tap on the Accounts & sync selection
2. Tap on Add account
3. Select the type of account to add (Microsoft Exchange, Facebook and Google are available by default)
4. Follow the on-screen instructions to configure your account (depending on account type, you will be asked to select what kind of data to sync to your device)
5. When complete, the account is added to the list in the Accounts & sync section and data will begin synchronizing to your device
Removing an account on Samsung Galaxy S II:
1. Open Settings, then tap on the Accounts & sync selection
2. Select the desire account you want to remove or delete
3. Then Tap Remove account
proceed?
Just confirm that you want to remove the account by tapping on Remove account or tap on Cancel if you selected the wrong account
Remove account
5. Your account will now be deleted
Friday, July 8, 2011
How to boost or increase earphone speaker volume on Samsung Galaxy S II I9100
If you are not satisfied and having problem on Samsung Galaxy S II speaker volume like its very low even you've already set to its maximum volume. Many users experiencing and been complaining about speaker volume like a very low on phone calls,earphone, headset and in the car using AUX.
This tips might help you solve the problem, give these a try just send us a feedback whether it works for you or not:
A) Enter service mode by typing below code on your dialer :
*#*#197328640#*#*
click the following:
[5] AUDIO
[1] NB (VOICE CALL)
Choose Handset, headset, Speaker (which ever you want higher volume)
[1] VOLUME
[1] SRC Speech RX Volume
Change default values and higher the values any number of your choosing, here is an example:
[0]0_lvl : 68
[1]1_lvl : 72
[2]2_lvl : 76
[3]3_lvl : 80
[4]4_lvl : 84
[5]5_lvl : 88 Higher these values to until hear volume improvement.
Can also edit the values from:
[2]DST I2S1 TX Volume
[3]SRC I2S1 RX Volume: 100
[4]DST Speech TX Volume: 94
This Samsung volume setting, worked for several people but sadly only worked 2 times for me and values keep resetting for me (doesn't mean for you, so give it a try) Also this is based on STOCK firmware.
B) the second thing you might to try is app called Volume+:
http://androidaudiohacks.com/home/vo...bread/download
This app guarantees it higher the volume without the need of touching its default settings, BUT huge drawback it highers everything: Headset, speaker and Bluetooth EXCEPT HANDSET which is the most important
(I also downloaded many volume increase apps, but Volume+ was the only one got the job done for everything but handset)
C) Lastly get GOOGLE VOICE app (create a GV account if you don't have one)
https://market.android.com/details?i...=search_result
just by installing Google and logging on, every time you make a call, your calls get forwarded through Google voice and volume levels become acceptable in ALL HANDSET, HEADSET, SPEAKER, BLUETOOTH (just like phone should of have been) (this what i personally use fix my volume issues)
If the above tips doesn't work for you, the best way is to complain it to your Samsung Galaxy S II provider.
ContinueReading..
This tips might help you solve the problem, give these a try just send us a feedback whether it works for you or not:
A) Enter service mode by typing below code on your dialer :
*#*#197328640#*#*
click the following:
[5] AUDIO
[1] NB (VOICE CALL)
Choose Handset, headset, Speaker (which ever you want higher volume)
[1] VOLUME
[1] SRC Speech RX Volume
Change default values and higher the values any number of your choosing, here is an example:
[0]0_lvl : 68
[1]1_lvl : 72
[2]2_lvl : 76
[3]3_lvl : 80
[4]4_lvl : 84
[5]5_lvl : 88 Higher these values to until hear volume improvement.
Can also edit the values from:
[2]DST I2S1 TX Volume
[3]SRC I2S1 RX Volume: 100
[4]DST Speech TX Volume: 94
This Samsung volume setting, worked for several people but sadly only worked 2 times for me and values keep resetting for me (doesn't mean for you, so give it a try) Also this is based on STOCK firmware.
B) the second thing you might to try is app called Volume+:
http://androidaudiohacks.com/home/vo...bread/download
This app guarantees it higher the volume without the need of touching its default settings, BUT huge drawback it highers everything: Headset, speaker and Bluetooth EXCEPT HANDSET which is the most important
(I also downloaded many volume increase apps, but Volume+ was the only one got the job done for everything but handset)
C) Lastly get GOOGLE VOICE app (create a GV account if you don't have one)
https://market.android.com/details?i...=search_result
just by installing Google and logging on, every time you make a call, your calls get forwarded through Google voice and volume levels become acceptable in ALL HANDSET, HEADSET, SPEAKER, BLUETOOTH (just like phone should of have been) (this what i personally use fix my volume issues)
If the above tips doesn't work for you, the best way is to complain it to your Samsung Galaxy S II provider.
How to upgrade official firmware on Samsung Galaxy S II I9100
If you are a new user of Samsung Galaxy S II I9100 and you wanted to upgrade your phone's firmware to any latest updates, all you need is a personal computer or laptop and install a software program called KIES, you can download it via Samsung official support.
You can't do it over the air or OTA like any other android smartphones by using software update option, Yes you can see a software update option in phone under settings and you need to specify your samsung account details as well.. but as of now its doesn't work on Samsung Galaxy S II I9100.
Aside from Kies update you can also manually upgrade the device by a way of using ODIN downloader tool and an original firmware.
This method is not recommended for beginners since it will cause some problems and sometimes mess up the phone, called bricking.
If you want to learn by this method you may visit XDA-developer, many advance users in there shares a useful tweaks and tips about Samsung Galaxy S II I900 firmware.
ContinueReading..
You can't do it over the air or OTA like any other android smartphones by using software update option, Yes you can see a software update option in phone under settings and you need to specify your samsung account details as well.. but as of now its doesn't work on Samsung Galaxy S II I9100.
Aside from Kies update you can also manually upgrade the device by a way of using ODIN downloader tool and an original firmware.
If you want to learn by this method you may visit XDA-developer, many advance users in there shares a useful tweaks and tips about Samsung Galaxy S II I900 firmware.
Thursday, July 7, 2011
How to Set a Custom Message Notification Music /Ringtone on Samsung Galaxy S II
Here's a simple guide on how to set a custom ringtone to your message alerts on your Samsung Galaxy S II. If you'll notice that you can't find an option to set what you desired music or tone to set it as a message notification alert.
Here's how to do it:
Connect your Samsung Galaxy S II to your computer or laptop and select "connection type" and get access to storage memory card. If you are having trouble on connection see the guide here.
Now after you have successfully connected you galaxy S II, browse to your mass storage then find the folder "Notifications", if its not on there, create a new folder and named it "Notifications".
Then grab a copy music files you wanted from your computer into that newly created folder "notifications". Once finishes, disconnect your Galaxy S II from the computer. Then you can set that music files as your message tone.
- Go back to the idle screen. Press the Home key.
- Then open the application list.
- Select Messaging.
- Then press on the Menu android-menu-key key.
- Then tap on Settings.
- Tap on the Notifications checkbox and ensure that the checkbox is checked.
- Tap on Select ringtone.
- On the popup select the ringtone you desire.
Here's how to make a custom notification message ringtone on the Samsung Galaxy S2 when you already have a music files stored or saved on your phone.
- Go to Menu
- My files, media
- Then make a map called 'Audio'.
- Open that map, and there you make another map called 'Notifications'.
- Move your mp3/sound/song/ringtone in that map.
- Now you can choose it in settings, sound, notification ringtone.
You can do the same thing with calling ringtones and alarms.
For that, make a map called 'Ringtones' or 'Alarms' in the 'Audio' map. So in Audio will be three maps, Ringtones, Alarms and Notifications.
ContinueReading..
Here's how to do it:
Connect your Samsung Galaxy S II to your computer or laptop and select "connection type" and get access to storage memory card. If you are having trouble on connection see the guide here.
Now after you have successfully connected you galaxy S II, browse to your mass storage then find the folder "Notifications", if its not on there, create a new folder and named it "Notifications".
Then grab a copy music files you wanted from your computer into that newly created folder "notifications". Once finishes, disconnect your Galaxy S II from the computer. Then you can set that music files as your message tone.
- Go back to the idle screen. Press the Home key.
- Then open the application list.
- Select Messaging.
- Then press on the Menu android-menu-key key.
- Then tap on Settings.
- Tap on the Notifications checkbox and ensure that the checkbox is checked.
- Tap on Select ringtone.
- On the popup select the ringtone you desire.
Here's how to make a custom notification message ringtone on the Samsung Galaxy S2 when you already have a music files stored or saved on your phone.
- My files, media
- Then make a map called 'Audio'.
- Open that map, and there you make another map called 'Notifications'.
- Move your mp3/sound/song/ringtone in that map.
- Now you can choose it in settings, sound, notification ringtone.
You can do the same thing with calling ringtones and alarms.
For that, make a map called 'Ringtones' or 'Alarms' in the 'Audio' map. So in Audio will be three maps, Ringtones, Alarms and Notifications.
Tuesday, July 5, 2011
Tricks: How to Disable Default System Applications on HTC Sensation
Many users have been looking answers on how to disable some applications on their HTC Sensation that don't suites their likings. Since advance users knows it that it is impossible to remove, delete, uninstall and disable those system bloatwares without rooting the phone. We found some guide over XDA-developer by way of temporarily rooting HTC Sensation will get access to somewhat disable the said system default applications or bloatwares.
Note: this guide is for advance users only that may know some tweaks about Android devices.
You may find the instruction here on this thread over XDA-developer.
ContinueReading..
You may find the instruction here on this thread over XDA-developer.
Saturday, July 2, 2011
Download Samsung Galaxy Mini S5570 User Manual
Get the information on how to navigate and operate your Samsung Galaxy Mini S5570 with its own users manual. This manual is packed all available infos in getting to know your galaxy Mini GT-S5570 and will help you to make use of your newly purchased Galaxy Mini.
Contents and details of this Samsung galaxy Mini S5570 users manual are guides of following:
- unpacking
- Installing Sim Card
- Installing battery
- Installing Memory Card
- Turning the device On and Off
- Idle screen navigation
- Touch Screen navigation
- Costumizing
- Application Accessing
And a lot more like:
Calling messaging, Downloading, Entertainment,Web browsing etc. this also includes safety precautions on how to properly handle you Samsung galaxy mini and troubleshooting tips to fix any unwanted issues.

Download Free Samsung Galaxy Mini user manual
For Orange Carrier UK, here you can download Orange Galaxy Mini user manual.
The Samsung UK official support page here The Samsung Galaxy Mini (S5570)
ContinueReading..
Contents and details of this Samsung galaxy Mini S5570 users manual are guides of following:
- unpacking
- Installing Sim Card
- Installing battery
- Installing Memory Card
- Turning the device On and Off
- Idle screen navigation
- Touch Screen navigation
- Costumizing
- Application Accessing
And a lot more like:
Calling messaging, Downloading, Entertainment,Web browsing etc. this also includes safety precautions on how to properly handle you Samsung galaxy mini and troubleshooting tips to fix any unwanted issues.

Download Free Samsung Galaxy Mini user manual
For Orange Carrier UK, here you can download Orange Galaxy Mini user manual.
The Samsung UK official support page here The Samsung Galaxy Mini (S5570)
Subscribe to:
Comments (Atom)